
The main goal of a VPN connection is to encrypt your data online. This includes encrypting your web browsing, and generally all inbound and outbound traffic. It can be used to mask visited websites from your ISP, as well as unlock geographically blocked sites. This is often essential for journalists in dozens of countries, who need to maintain their anonymity to prevent themselves from being prosecuted for speaking against an established regime.
That is an extreme example of a need for a VPN, but it brings us to an important question of concern. Can your VPN service fail? The answer is yes.
One of the main ways it can silently fail is through a DNS leak. VPN connections can also fail victim to interruptions. If the user does not have a fail-safe, it might go unnoticed and leave further online activity unencrypted. Thus, VPN users whom cannot afford to have their encrypted connection fail at any time use a VPN killswitch to avoid any data leaks.
However, DNS leaks can fly under the radar much easier.
First Things First
Before coming to the problem of leaks, it is essential to know what exactly a DNS is. The Dynamic Name System, or DNS, is used to translate the name of any domain on the internet into numerical IP addresses by the ISP. As written in dyn.com, the DNS serves the purpose of acting as a “phone book for the Internet. If you know a person’s name but don’t know their telephone number, you can simply look it up in a phone book. DNS provides this same service to the Internet.
When you visit http://dyn.com in a browser, your computer uses DNS to retrieve the website’s IP address of 204.13.248.115. Without DNS, you would only be able to visit our website (or any website) by visiting its IP address directly, such as http://204.13.248.115.”
A DNS request usually gets passed through a VPN tunnel to the provider’s DNS server rather than the ISP’s. However, in many cases, the latter ends up receiving the DNS request. This is quite common for Windows users due to the default settings of the operating system. Such a phenomenon is known as a DNS leak, and it can expose your movements on the internet to your ISP. And that can have disastrous consequences.
A dependable VPN service should not have any DNS leaks, period, but at times the variables are uncontrollable circumstances.

In summary, even when using a VPN, it is possible that the DNS request ends up being sent to your ISP instead of through the VPN’s server. Thid is what causes the DNS leak.
It’s alarming, but it can be prevented! An ounce of prevention is worth a pound of cure. So, if you are interested in stopping a DNS leak from occurring, here are a few important steps that you can take.
How to Detect DNS Leaks While Using a VPN
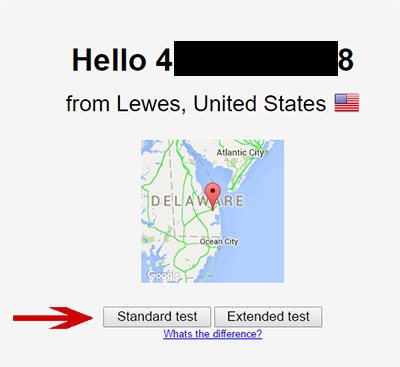
My number one way to verify for leaks is to head straight to www.dnsleaktest.com. They provide a dependable and trustworthy website that quickly determines your DNS server visibility. They offer a standard and extended test, the latter provides more hop points during the route test.
Initially when you visit the website, it will display your currently traceable IP address and location. If you’re connected to a VPN, this location should reflect the VPN server location you are on. Simply click on the Standard or Extended test button to begin verifying your DNS servers.
Once the test is complete, it should again reflect your VPN server location. It Shouldn’t display your ISP name or IP addresses and the host names related to it. There is no better way to quickly check for a DNS leak online, a simple click and you have your results.

First and foremost, let me say that DNS leaks should not happen on any VPN service.
However, faulty or corrupted installs, and even Windows system bugs, can cause problems. Once your VPN connection is established, it should automatically take control of DNS routes. If for any reason you do have a leak, try the following:
– Un-install and Re-Install VPN Software
It’s rare, but users have reported having DNS leaks on even some of the most reputable service providers. A first general step to take is to completely uninstall and reinstall the latest VPN client software from your provider. That is, of course, assuming you are using software.
– Change DNS Servers to Public or Private Ones
Another important step we suggest to take initially without hesitation, is to change DNS servers provided by your ISP to alternative ones. It is commonly known that Google and others provide public DNS servers that you can configure on your computer and router. Not only will it effectively reduce your ISPs ability to view what websites you visit, it is also one of the most effective ways to eliminate the risk of DNS leaks.
Additionally, changing to one of these DNS servers can increase the speed that your internet connection can reach websites. Below are some secure DNS servers that are available to use at no cost.
- Comodo Secure DNS – primary: 8.26.56.26 – secondary: 8.20.247.20
- Open DNS – primary: 208.67.222.222 – secondary: 208.67.222.220
- Google Public DNS – primary: 8.8.8.8 – secondary: 8.8.4.4
By changing your DNS servers, you can make sure that your ISP is not spying on you. Here is how you do it (especially for Windows 7 users):
- Navigate to the Control Panel and open Network and Sharing Centre. Then, click on ‘Change Adapter Settings
- Find your main connection and right-click on it to select ‘Properties.’
- Browse through the list and find ‘Internet Protocol Version 4’ (TCP/IPv4). Highlight the term and click on ‘Properties.’
- Throughout this entire process, make sure that you note down your previous DNS server addresses. This might come in handy if you wish to restore your previous settings anytime in the future.
- Select the ‘Use the following DNS server addresses’ radio button, and type in the relevant addresses. Click ‘OK’ to restart your connection.
Speaking of DNS requests, it brings a lesser known, and slightly more complicated problem that occurs with ISP gateway modems. If you don’t plan on setting up a VPN directly on your router, you can skip the next section.
– Verify Your Modem and Network Router Topology (Connection Pattern)
For advanced network options, such as configuring your VPN service directly on the router, if a DNS leak is still occurring, it can be caused by your operating system, or an incorrect network topology setup.
What is network topology you ask? Put simply, it is the combination of networked hardware, and the order in which it is connected together. In other words, the pattern starting at your modem, all the way to the connected devices. A correct VPN network router topology would look something like this:
Stand-Alone Modem ====> Network Router (VPN addresses hardcoded) ====> Connected Devices (eg: computer, smartphone on wifi)
A common problem many users face is when their ISP provides them a ‘Gateway’ Modem. These common modems are used by many giant internet service providers. A Gateway modem is a term used to describe a modem and router combined in a box. ISPs use these to give the option of having Wi-Fi without the need to purchase a router.
The problem with this is that unless you can disable the router portion of the gateway, it will control you DHCP requests, as well as DNS queries, even if you have a second router behind it connecting through a VPN. It also causes a networking problem known as double NAT resolution. Only one router device can handle the networking efficiently, and this is why switches exist.
With that said, if you’re using a VPN client installed on your computer or mobile device, even connected to the gateway, the DNS should be routed to the VPN. This is mostly important if you plan on using routers to connect to VPN servers.
A Quick Recap On Network Topology
Before I go on, I realize that most networking newbies are probably screaming at their screen, what is this guy talking about!?
To summarize in simple terms, if you plan on connecting your router to a VPN, make sure you have a stand alone modem from your ISP and not one that has Wi-Fi and network routing capabilities. Turning them off is usually difficult or impossible due to the restricted firmware.
Additionally, daisy-chaining routers does not work well, and causes NAT resolution problems. Without getting any further into a full fledged networking lesson, just understand that this is a no-no, and could cause DNS leaks.
DNS Leak Protection
Different Methods to Prevent DNS Leaks on a VPN
Beyond basic steps to better protect your DNS data, and fix existing leaks, some users approach their online privacy with much higher regard. This is where additional tools can be used to protect and prevent DNS leaks from happening:
– Use a VPN with DNS leak protection
As we’ve said, a VPN service should not have a DNS leak to start with.
However, since it can still happen in rare cases, opting for a service that has additional leak protection is a good option. Similar to a VPN killswitch, the service monitors DNS queries and blocks all data transfers if a leak is detected. Many top services have the protection built-in, while others have the option to turn it off or on in their settings.
- ExpressVPN – built-in leak protection
- NordVPN – In Settings: DNS Leak Protection check box
- Private Internet Access – In Settings: DNS Leak Protection check box
- TorGuard – built-in leak protection
- PureVPN – Settings: Switch to SecureDNS
- Mullvad – In Settings: Stop DNS leaks option
The list goes on. More and more services have opted for additional leak prevention tools and guides in order to minimize the problem. Opting for a good service provider is a must if you expect to have a trustworthy service and a truly privately routed network.
– Use a VPN Monitoring Tool
Another solid option for adding another layer of protection is using software that monitors your VPN connection at all times. These tools aren’t free, but they’re affordable.
The two options we have tested are; OpenVPN Watchdog for OpenVPN users (costs $10 USD per year) and VPNCheck Pro (costs $20 USD one-time fee). Being that not everyone will be using OpenVPN, VPNCheck Pro edition is usually the popular choice.
- Download VPNCheck Pro. Sweep through the installation process and then run it.
- Now click on ‘config’ which appears on the main screen.
- Make sure that you ticked the ‘DNS leak fix’ option. Then, to get everything started, go back to the main screen and select any of the two; Cycle IP: Task or Cycle IP: Network.
These tools are not only effective and cheap, but they also protect against IP leaks, and constitute a full solution for VPN leak protection of any type.
Windows Teredo Leak Fault
Another step to reduce the risk of leaking your domain name resolution address, is to disable Teredo inside of your Windows OS. This Windows tool is used to allow communication between IPv4 and IPv6 protocols. As IPv6 becomes more and more common on the web, there are more instances where Windows may try and use Teredo. The only problem is that it is known to cause leaks. Therefore, taking this step should be a must for Windows users.
In order to disable Teredo, you must launch a command prompt. To do so;
- Go to start menu and type ‘cmd’ inside of the search box, hit enter
- A black backdrop command prompt window will open, type the following command line:” netsh interface teredo set state disabled “If you ever need to re-activate it, bring back your command prompt and use the following command line:
” netsh interface teredo set state type=default “
Conclusion
Since anonymity is one of the main reasons VPN services have become desirable, it is imperative to realize that there are areas where it can be compromised. DNS leaks is one such area. Hence, adopting strict measures is important to stay immune to such encroachments on anonymity.
WE hope that this guide, and the data provided herein, have been enough to answer most of your questions. So get moving towards superior online security and if you have any questions, ask in the comments below.